Friday, 12 June 2015

Five House Hacks That Will Change Your Life

Finding new ways to make life a little easier is always time well spent. So we decided that we would find innovative house hacks for you because we understand how important your time is. In the list below you will find easy, cost effective and fun ways to make your house a little more functional and a little less boring by using everyday items that are just lying around the house.

1. Door Knob Hangers

If you’re always looking for a place to hang your towels or clothes in the bathroom, this hack is just for you. Try fixing an old door knob to the wall, it looks great and you’ll never have to pick your clothes up of the floor again.

2. What Chalk is Really For

Don’t you just hate it when someone greases up your freshly painted wall? Well, you can solve your greasy fingerprint problem with chalk. Just chalk up the fingerprints and wipe down with a damp cloth.

3. Wired up Coat Hangers

With the age of technology comes cables and knotted wires, one of the most widely faced issues. Use a coat hanger to easily store your old cables and wires and you’ll never have to sit there for hours unravelling them.

4. When Life Gives You Lemons

Everybody loves to eat home-cooked food, but only a few will stay back to help clean up. Ovens take the longest, but if you cut a few lemons, put them in some water and then place them in a pre-heated oven until the water starts boiling, you’ll be able to wipe away that stubborn grease with ease.

5. The Nail, the Hammer and the Magnet

All DIY lovers, glue a magnet to the end of your hammer so you don’t have to hold dirty nails in your mouth while you work.

Connect with B&D

If you have any tips or tricks that have worked for you, share them with us on Facebook or in the comments section below. 


Thursday, 4 June 2015

5 Reasons Why DIY is So Amazing

Making something with your own hands is always a feeling of indescribable happiness. Perhaps, that’s the reason which has led to the growing popularity of DIY products in the world.

From page wreaths to lava lamps, DIY lets you explore your hidden skills and inner talents, and once you see the positive results, your happiness will be boundless.

Here we give you five reasons, why DIY is so amazing for your life:

1. It brings out a feeling of independence in you

Source: popsugar

The human mind is a very dependent substance. From food to clothes to shelter, it is programmed to depend on outer sources to have its bucket list fulfilled. DIY gives you the chance to give yourself a shot, be it by making your own clothes, designing the walls of your house by yourself or by preparing a delicious meal. It lets you explore your own personality and pave way for a more independent you in the long run!

2. It gives you the best platform to learn

Source: construction photography

In life, we try, we fail. We try again, and maybe we fail again. We try once more, and voila! We succeed! That is what DIY is all about as well. It helps you to adapt to the trial and error that life is, gives you a taste of bitter and sweet from both worlds of failure and success and most importantly, let’s you learn and become a pro from a beginner.

3. It brings you appreciation

Source: Soda head

How many people are able to stitch their own clothes, design their walls and gift their friends, hand-made goodies? With DIY you can not only do this stuff, but also earn accolades from others for being able to do so.

4. It is pocket friendly

Source: clickprefect

While DIY is no doubt time demanding, it is also pocket friendly and can save you a lot of money which would be otherwise spent on buying things from conventional stores.
5. Self made is euphoric


Recall the moment you got your first pay check after pouring in all the sweat and hard work? Wasn’t it the best feeling? Well, with Do it yourself, you can always relive that feeling as being self-made or making anything yourself is probably in the world.

Connect with Us

Have some interesting DIY items to brag about? Share them us on Facebook and we might include them in our next blog.


Friday, 29 May 2015

DIY - A Beautiful Book Page Wreath From Old Papers

Best out of waste - the term certainly brings back school memories where you were to show your talent on bringing the best out of something that was technically of no use any longer. Well, not much has changed and you can still showcase your talent in making something creative out of things you would normally dump in the trash.

Here’s a fun technique to utilize old pages and manifest them into a beautiful wreath that will not only give your wall a classic look but also be an inexpensive way of exercising your creativity.


                    Image source: Jones design company


Things You Will Need:
-A thin, flexible metal rod

-Lots and lots of old papers

-Glue

-Scissors

Here’s what you need to do:

1) First, take the thin flexible metal rod and wrap it around a big circular object in order to get a perfect round shaped ring. The metal rod will be a little stubborn to bend but this will be the base of the wreath and hence, needs to be strong.

2) Now get your hands on those old papers and cut them in half with the help of scissors. Fold them evenly and staple them from the bottom. Make sure all your papers are cut in same lengths else your wreath would look uneven.

3) Next, take a paper punch and dig a hole on each of the papers that you have just cut. Slide the papers one by one on to the circular ring.

4) Now you need to use some glue to stick these pages on the ring in such a way that will prevent them from falling apart.

5) Now it’s time to leave your creation for a while to let it dry. Once that’s done, voila! You are ready to hang it on your wall, giving your home that vintage touch with just some creative techniques.

You can also place a bow or any other shiny object in the center of your wreath to make it more attractive.


If you like more colors, you can use colorful pages instead of the white and black set up. You can also use a CD as your base instead of a bigger circular object if you want your wreath to be small.

Connect with us:

Don’t forget to share what you came up with. Follow us on Facebook to keep a tab on some more of our creations. Also, do share with us if you have pictures of your own creations and projects, we would love to see them.


Friday, 15 May 2015

Innovative Ways to Stay Cool This Summer

We’re half way through the summer and a feeling of relief can be sensed among the population. Some cities across the country witnessed an extremely hot summer period while others felt right at home in the blistering heat. Before we start our monsoon celebrations we still have about 60 days of the season left.
We're giving you a few tips and tricks that you can try to stay cool and beat the heat this summer, some may sound strange but trust us, they work.

1. Utilize the freezer


About 10-15 minutes before you sleep, put your sheets in the freezer to cool off. Do make sure you place them in a plastic bag before you place them inside the freezer as you don’t want the smell of yesterday’s dinner to be absorbed by the fabric.

2. The wet cloth method
This trick is right out of a science book and it works wonders. Place a damp cloth over a stand fan or in front of an open window, when the fan is switched on or a breeze comes through, it’ll cool down the room instantly.

3. The cold water bottle


In the winter, many of us resort to hot water bottles to keep us warm, but you can also use them in the summer. Simply fill ice-cold water into it and keep it with you when the heat becomes unbearable.

4. Get down
We all know that hot air rises. So the perfect place to set up camp would be closer to the ground. Substitute your fancy bed for a comfortable mattress and you'll feel cooler in no time.

5. Get creative


Grains like rice and buckwheat aren't just for consuming, you can make a pillow using these as they don't absorb heat like cotton or goose feathers.

Connect with Black & Decker

If you used any of these methods or have a few ingenious ways to stay cool of your own, we’d love to hear from you. Get in touch with us on Facebook and leave your comments, thoughts on the blog or any sort of feedback.

Thursday, 7 May 2015

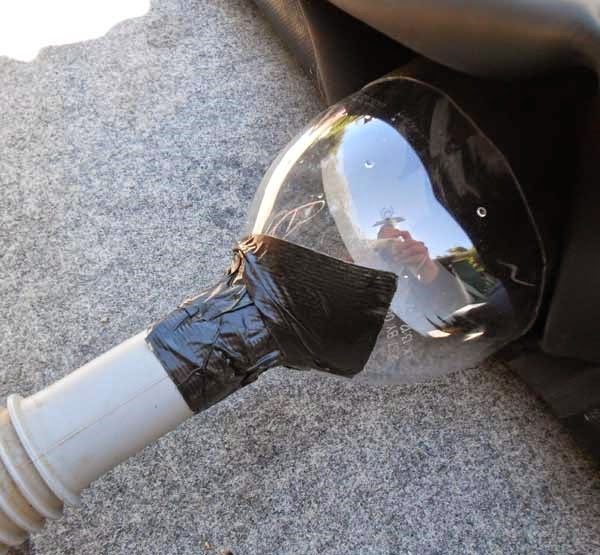
The DIY Water Conserving Garden Sprinkler


Watering your garden with a garden hose wastes a lot of water and the pressure of the water can damage your baby leaves and buds. Sprinklers, on the other hand, work wonders in a garden. On high pressure, they spurt water out for your leaves; while on a low pressure, you can use them for soil wetting too. This DIY garden sprinkler is easy to make and it helps conserve water.

Things You Will Need:
Here’s What You Need To Do:
  • The first thing you need to do is connect your bottle with the hose using the water proof tape.
  • Tape the hose to the bottle multiple times and make sure there is no gap, thereby avoiding leaks. 
  • Be sure to test it against pressure as you do not want it to disconnect later. 
  • Drill holes in the bottle, placing the holes wherever you want water to spurt. Be sure to use protective gear while drilling to prevent any injuries. Safe DIY is good DIY!

  • Test-run your sprinkler and check for any leaks, especially where the tape connects the hose and bottle. If there are, identify the leaky spots and reinforce with the tape.
                            
  • Finally, turn the tap on and reap rewards for your labour. Keep your gardens looking its best while saving water! Also, don’t forget to use kitchen waste and kitchen water for your garden to keep it nourished and healthy. 

Connect with us:

Do-It-Yourself projects are perfect activities to beat the summer boredom, follow us on Facebook for more DIY projects. Also, don’t forget to share pictures of your own projects with us; we’d love to see what you’ve done.

Friday, 17 April 2015

Keep Garden Pests at Bay in a Healthy Way

Summer is a great time in your garden; growth accelerates as new leaves and shoots grow out and slowly make their way to flowering. At this time, remember that it’s best to water your garden in the morning so that the scorching sun doesn’t dry up your soil too much. A healthy looking plant in your garden can be highly infected and it takes a close view to see these pests. Mealybugs tend to hide inside new leaves and shoots and spread faster than lice in a playground. Of course, there is the common powdery mildew that contaminates your plants due to low ventilation and takes refuge under big leaves. Also, spider mites infect your plants visibly and suck the life out of it, as leaves turn yellow and your plants droops down in sorrow.

A common solution to these problems is pressure washing. We recommend the Black & Decker 100 Bar Pressure Washer on low pressure for this process. Tip your plant over, as you don’t want to wash away the soil, before pressure washing the leaves and shoots. Parasites like scale insects tend to cling on to your plant for dear life, and need to be scraped off with fingernails as you wash it off.

In some cases, pests tend to over populate on plants and if they are not spotted early enough can infect a plant completely. At this point, accompany daily pressure washing with neem oil or neem spraying to safely eradicate these pests. By using pressure washing and neem, you can refrain from using chemicals; as they not only smell like rotten eggs but are also poisonous to your plant, your pets and your family.

Here are some tips to keep your garden looking its best:

· Grind eggshells into a powder and sprinkle it over the soil, this gives your plant calcium and isn’t an eyesore like crushed eggshells.

· While cooking, save vegetable cooking water instead of throwing it and water your plants (only the soil) with this water. A great vegetable soup is a nutritious treat for your plants.

· Tea leaves are excellent for increasing the acidity of your soil. As this is beneficial to your plants, don’t always throw strained tea leaves, occasionally sprinkle some on the soil.

· Plants love company! So, go ahead, layer your plants in a couple of rows. Be careful not to overcrowd, poor ventilation attracts trouble.

· Spend time caring for your plants. Individually inspect them for pests and don’t be shy, they just might enjoy light petting.

Black & Decker knows best: 

Follow us on Facebook for more gardening tips and summer activities; send in pictures of your lovely garden as we’d love to see what you’ve done.


Thursday, 2 April 2015

Do It Yourself - The ideal Portable Summer Table


The summer breeze has been said to bring new friends; with that it brings more parties and trips to the beach. A portable table for these activities will always come in handy to keep food and drinks. This portable table can be rolled up into a nice bundle as you move from place to place. Go ahead and try this ten step method to build your own portable table.                                                                                                                                                                                                                                                                                                                                                                                                                                                                              

Things you’ll need:

· one 48 x 7/8 (inches) wooden solid cylindrical rod

· three 2 x 1/4 x 8 (inches) hardwood planks

· one 1 x 1/4 x 8(inches) hardwood plank

· four 1/4-20 x 1(inches) Carriage bolts                                                                     
· four 1/4-20 threaded insert nuts

· 4 x 1(inches) nylon web belt

· ¼ (inches) staples

· a Black & Decker Circular Saw (CS1500 184mm)                                                                                                                          
                                         

Here’s what you need to do:
1. Commence by cutting the rod into four equal length pieces.

2. Cut the two inch hardwood planks into 24 inch pieces. You will require ten pieces. Trim the whole stack at once to make sure they are all of equal length. You'll need two 24 inch pieces of the one inch hardwood plank too.

3. Scrub the ends of the rods and the planks with sandpaper.

4. Cut two 24 inch pieces of nylon web belt and burn the ends. This will protect it from fraying.

5. Arrange the planks side by side and make sure they are evenly spaced.

6. Staple the belt to the planks; make sure the staples are shorter than the thickness of the wood and staple. Use a strong stapler gun. Use a hammer for assistance.

7. Install all the planks making sure to move your spacers and keep the web belting pulled tight.
8. Place the one inch planks across the table top and drill ¼ inch holes in the corners. These one inch planks serve as spreaders to keep the nylon web belting tight. Widen the holes in the tabletop to receive the square head of the carriage bolts. After this, install the spreaders.

9. Now, for the legs, Mark one end of each rod in the centre and drill a 5/16 inch hole one inch deep into the end.

10. Install threaded inserts in the rods.


Finally, throw it together, screw the legs onto the carriage bolts and flip it over. You can now paint it or customize it as you wish. Enjoy your new portable table!

Connect with us: For more interesting DIY projects follow us on Facebook. Also, we’d love to hear from you; send us images and tell us about your DIY projects.