Showing posts with label Do it yourself. Show all posts

Monday, 26 October 2015

5 DIY projects for your beloved pets

Our pets fill our lives with immense joy and positivity. Be it after a stressful day at work or a busy bee routine for the week, our pets are always there to not just relieve us from stress but also show us that someone cares. So in return, we can do something for these bundles of joy too.


In this week’s release, we are going to see five simple DIY projects that we can create to reciprocate the love and affection to your pets.

1.       Pallet dog bed

source: iheartdogs

Transform your old pallet into a brand new bed for your dog or cat. The concept is pretty simple, which would require you simple ingredients like an old pallet, measuring tape, fabric and other stuff like paint and zippers to showcase your favorite kind of art on your dog’s cot.
For a step by step tutorial, click http://bit.ly/Zzf9ws

2.       Suitcase bed for your cat

source: vetcall

How amazing it is to have a perfect and cozy bed for your beautiful fluffy cat made out of your old suitcase? Well, this simple DIY tutorial will tell you how. http://bit.ly/1GusV7B

3.       Feeding station for your pet

source: etsy

You enjoy your delicious food at the dining table; how about making a perfect dining station for your pet as well? Click on this simple tutorial to learn how to do it- http://bit.ly/1OLIx9O

4.       Cute fabric teepee

source: fudgeandjoy

Pets love to spend time with you outdoors and hence, the best gift you can give your pets is by creating a cute fabric teepee to make their outdoor moments fun and memorable with you. Follow this easy step by step guide to create one yourself— http://bit.ly/202Ec5R


5.       Homemade organic shampoo

source: seespotbake

If you believe in avoiding the chemical decked shampoos in the market and sticking to organic and herbal stuff, then why not create some organic stuff for your pets as well? This easy guide to make home made shampoo for your furry buddy is not just easy but also great for its health—


Connect with us

If you have got pets and you have tried your hand at DIY projects to create something special to show your love and affection to your dearest fluffy pals, do share them with us! You can follow us on Facebook or leave your comments below.


Friday, 28 August 2015

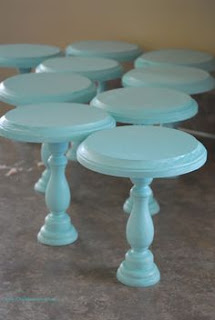
DIY— Cake Stands for Yummy Cakes and Cupcakes

You hear the word ‘cake,’ and the term ‘Yum’ is pretty instantaneous as a reply that comes out of your mouth. The whole thing about cakes and confectionaries is pretty dramatically appealing and manages to elate anyone, regardless of age to go a little berserk to have them all.

Well, if you are a fan of yummy cakes and good decorations around, then you might want to give making beautiful cake/cupcake stands a try yourself!

So in this week, we are going to tell you how you can create beautiful cake stands for some yummy and savoring cakes.

Things you will need

- Old microwave plates

- Candle stands

- Pie dishes

- Spray paint

- Glue

  1. Take a candle stand and on top of it attach one of the old microwave plate or a pie dish.

  2. Make sure that you use good glue so that the objects are fixated properly to each other and don't fall apart.
  3. Take a spray paint—colour can be of your choice. You can keep it plain black, blue, or white if you want a monochromatic look, or go for multiple colors for a more colourful outlook.
  4. Spray the first coat of paint upside down. As you leave it to dry, take another stand and repeat the same step of attaching it to a pie dish.

  5. You will need altogether three coats of spray paint, neatly done, for a clean finish and shiny appearance.
  6. Once that’s done, you have your all new cake stand, completely made by you!


Connect with us

If you too have some amazing ideas for decorating confectionaries or making stands for cupcakes, cakes and other food items, don’t forget to share it with us. We would love to hear you! Connect with us on Facebook or simply leave your comments below.

Friday, 21 August 2015

DIY—Colourful dotted tumblers

Colours add meaning to life. It is an undeniable fact that colours always grab your attention and make you appreciate the beauty of them, regardless of how old you are. Now when it comes to getting creative, you can do wonders with some colours.

In this week’s release, we tell you how to make some beautiful, colourful dotted glass tumblers that you can use not just as a decorative piece of art in your own house but also gift it to your near and dear ones.

Things you will need:
-Enamel acrylic paint—red, blue, green, white, yellow.

-Two/ Three glass tumblers

-Cotton swabs

-Paper towel

-A parchment paper

-A sheet pan

Steps to make colourful dotted tumblers:

1.       Arrange all your items in one place, and choose the colours of acrylic paint that you want to use in your tumblers


2.       Take a sheet of paper towel and fold it evenly into half. Pull out dollops of each colour from the acrylic paint containers on the paper towel.


3.       It is up to your creativity when it comes to mixing colours. You can keep it simple or try experimenting, additionally, adding white to them to get some more new colours that you would like on your tumbler.

4.     Take a sheet of parchment paper and place it properly on the sheet pan.  Now flip your glass tumblers upside down on the pan, and dip your cotton swab into the colours and start dotting the tumblers. This will be your first layer of dots. As you are done with one tumbler, keep it aside to let it dry while you continue working the same way on the other tumblers. 


5.       After you are done with the first layer of dots and it is dry, start with the second layer, experimenting with your desired colour combinations. Be careful to dot from the base to the sides of the tumbler, and avoid getting closer to the edges.


6.      As soon as you are done with the double layering and you are sure that the paint has dried up, insert the pan inside a cold oven and bake your creation at a temperature approximately at 350 degrees Fahrenheit, for around 20-30 minutes in order to set the paint.


7.      Once you are done with the baking, let it cool down for a while before you flip them. And there you have it! Your own DIY colourful dotted glass tumblers. Gift them to your friends or keep them as a show piece.

Connect with us:

If colours are a part of your DIY projects as well, then we would love to see some of your creations. Connect with us on Facebook, or leave your comments below. We are always pleased to read them!

-
Images source: popsugar


Friday, 7 August 2015

B&D DIY: Insulated Plastic Cup

A barbeque party, office tea or a glass of wine, drinks are more enjoyable when you can sip them at the temperature you want, cold or warm. Thanks to the wide world of DIY, getting creative and make an insulated cup yourself is easier than ever. This imaginative innovation will help keep your drink the temperature you want for longer.

Here’s what you will need:

- One paper towel
- Two plastic cups

Yes, that’s all you would need!

Here’s what you need to do:

-Firstly, get all the materials you need in front of you so that when you start work, you can finish it without moving to and fro.


-Now, take one large sheet of paper towel, fold it in half length wise.
 

-After that, wrap the folded paper towel around one of the plastic cups. Make sure it’s tight and snug.


-Now insert the paper towel wrapped cup carefully into the other plastic cup. 


-That’s it. You are done. Wasn’t that easy?

You can test it for yourself and see your drinks will not only retain their temperature in these insulated cups, but also prevent any condensation of water droplets outside of your cup.

Connect with us

For more interesting DIY tips and tricks, follow us on Facebook. Also, if you found this helpful, share this with your friends and family. Happy DIY’ing

[Images Courtesy : Instructables.com]

Friday, 31 July 2015

Five DIY’ing Instagrammers

In this week’s release, we have searched through Instagram thoroughly to bring you a few DIY projects and crafts that people around the world have done. Some are functional, while others are decorative and you will probably find one that is both.

Hopefully these will inspire you to kick on and try a project for yourself.
  1. Let’s start small. Something nice for you hyper children to keep them occupied. Although make sure when they're playing, they're also wearing safety goggles.
  2. Speaking of children, what about some minion cupcakes. They're easier than you think.
  3. Sticking to the small ones. What about these DIY earrings? Great work by this instagrammer!
  4. A photo posted by @heavens_natives on
  5. Here is something a little more functional. Now your shoes can be kept as neatly as your clothes.
  6. For those more adventurous, here is an idea for your bedroom.
Are you brave enough?

Let us know which one of these you liked and would consider trying, leave your questions and comments below and we will help you with any information regarding the tools you will need and the materials.

Follow us on Facebook for more updates.

Friday, 24 July 2015

DIY: The Coin Vase

A common misconception these days is that DIY is mainly pursued to fix or build things. What people forget is that there a few things you can do to improve upon an object or parts of your house, either for appearance or functionality purposes. If you have been following our Facebook page, you would have noticed that we at Black & Decker are on a mission to convert shoppers into what we like to call, DIY-ers.

Stop buying and start making. That is our philosophy and this week we are going to show you how to glam up an old vase. Many of you will say that most vases are already decorative and very pleasing to look at.

Well, if you have owned one you would know that after a few years the same design can get a little boring and it will soon defeat the very purpose it was bought for (To please your taste). Follow these steps and we guarantee a smile with a tilted head at the end of it.

What you will need
  • An old and boring vase
  • Lots of coins, about 100 to be on the safe side
  • Black acrylic paint. Nothing too glossy
  • A strong adhesive

The procedure
  1. First, paint the entire vase with the black acrylic paint. Once it has dried, give it another coat.
  2. Leave it for a while until the vase is completely dry.
  3. This next step requires you to get the coins out and stick them next to each other, moving all the way around the vase, like this.


  4. Once you have covered the entire area with coins, you need to let the glue dry.
  5. Once the glue is dry and you are sure that none of the coins will fall off, the next step is to find a spot to place this vase and fill it with flowers or potpourri.

                           Source

As simple as that

That was simple enough. For more great home improvement ideas, follow us on Facebook and bookmark this page. We will be back next week.

Friday, 17 July 2015

How to Hide Those Ugly Electrical Cables

Televisions, home theatres, DTH boxes, all of these have one thing in common and that’s ugly looking wires. What is the point of having a clean, well maintained home if everybody can see those ugly wires hanging out or spread across the floor? There has to be a way to conceal them. In today’s blog we will be giving you a few ideas on how to hide those ugly cables and add something unique to your house.

The Regular

First up, you have your everyday methods that everybody uses, if you’re the type that doesn't worry too much about aesthetics but mostly on functionality then these methods will suit you just fine. They're easy to do and the materials will not cost you too much either.

Rubber pipes, commonly used and very effective. They're also wallet friendly.


Source: Unplggd

A cage holder. Looks more difficult than it really is but offers you a different dimension.


Source: Buzzfeed

Pandora’s Box. All you need to do, is to make subtle colour boxes.

Source: Buzzfeed

It doesn't have to be just leaves, you could try anything.


Source: Viral Nova


The Creative

If you fall into the category that is completely opposite of the one above and your home aesthetics matter a lit, you will definitely love these ideas. They may require a bit more of your time but you can’t put a time limit on innovation.

Wire art. This may take some time but it’s definitely worth the effort.


Source: WooHome & HermanMiller

The Socket House. You can also add some colour and design to really spruce it up.


Source: WooHome

How about a TV Tree?


Source: Etsy


Connect With Us

It is all up to you and your choice of expressions. Now you will never have to worry about the messy cable pile or spending hours to untangle them.

For more innovative DIY ideas, follow us on Facebook. You can also share some of the work you have done and we will feature your work on our blog.


Friday, 10 July 2015

No More Window Shopping

Window shopping is a cruel game between consumers and brands, an unfair one that usually results in big brands having their way with their customers. Sometimes it’s a matter of wanting rather than needing and that is what gets you caught in the never ending “should I or shouldn't I?” problem.

There has to be a way to stand up to over-priced commodities that you simply ‘must have,’ take the power into your own hands and fight back. There is a way, but many are too afraid to try it, we can’t really understand why. It’s simple enough if you have the right tools and material.
Here are five things that you wanted, which you can now make at home by yourself.

1. An iPad dock made out of wood. Source

2. A Star Wars Lightsabre.  Source


3. A magnetic drop-catch bottle opener Source


4. A Viking beer mug. Source


5. And finally, a Keezer Source


Do More with B&D

If you tried to make any of these, send us a picture of your finished piece and we’ll gladly share your work on our blog.

For more interesting DIY tips and ideas, follow us on Facebook. You will definitely find something that you can use.

Friday, 26 June 2015

7 DIY Crafts That Will Inspire You To Try It Yourself

More than providing the tools and appliances, we love to inspire. In the words of former president of the United States of America, John Quincy Adams, “If your actions inspire others to dream more, learn more, do more and become more, you are a leader.”

As leaders in home improvement and construction, we thought in this week’s post, we will do our best to inspire you with great craft ideas that are effortless to try and could potentially improve the look and feel of your home.

Penguins are definitely in the ‘most adorable’ top 10 but this one takes first place.

Colours make people happy and so does hot tea. What happens if you put them both together?

A little trick that I’m sure everybody would want to know. We hear snowflakes are a bit tougher but look better.

An inspirational list is nothing without a sweet treat.

Love to be organised? This can really help you out and it’s easy to do.
A photo posted by MAR19.83.70.87.PAN (@mar19.83.70.87.pan) on

“Winter is coming” and that call for knitted shoes.

We saved the best for last. An eco-friendly flower pot.


Share your crafts with us

If there is something that you have taken time out to make or build, share them with us and we’ll feature you in one of our DIY inspiration blogs. You can send your pictures in on our Facebook page.

Friday, 12 June 2015

Five House Hacks That Will Change Your Life

Finding new ways to make life a little easier is always time well spent. So we decided that we would find innovative house hacks for you because we understand how important your time is. In the list below you will find easy, cost effective and fun ways to make your house a little more functional and a little less boring by using everyday items that are just lying around the house.

1. Door Knob Hangers

If you’re always looking for a place to hang your towels or clothes in the bathroom, this hack is just for you. Try fixing an old door knob to the wall, it looks great and you’ll never have to pick your clothes up of the floor again.

2. What Chalk is Really For

Don’t you just hate it when someone greases up your freshly painted wall? Well, you can solve your greasy fingerprint problem with chalk. Just chalk up the fingerprints and wipe down with a damp cloth.

3. Wired up Coat Hangers

With the age of technology comes cables and knotted wires, one of the most widely faced issues. Use a coat hanger to easily store your old cables and wires and you’ll never have to sit there for hours unravelling them.

4. When Life Gives You Lemons

Everybody loves to eat home-cooked food, but only a few will stay back to help clean up. Ovens take the longest, but if you cut a few lemons, put them in some water and then place them in a pre-heated oven until the water starts boiling, you’ll be able to wipe away that stubborn grease with ease.

5. The Nail, the Hammer and the Magnet

All DIY lovers, glue a magnet to the end of your hammer so you don’t have to hold dirty nails in your mouth while you work.

Connect with B&D

If you have any tips or tricks that have worked for you, share them with us on Facebook or in the comments section below. 


Thursday, 4 June 2015

5 Reasons Why DIY is So Amazing

Making something with your own hands is always a feeling of indescribable happiness. Perhaps, that’s the reason which has led to the growing popularity of DIY products in the world.

From page wreaths to lava lamps, DIY lets you explore your hidden skills and inner talents, and once you see the positive results, your happiness will be boundless.

Here we give you five reasons, why DIY is so amazing for your life:

1. It brings out a feeling of independence in you

Source: popsugar

The human mind is a very dependent substance. From food to clothes to shelter, it is programmed to depend on outer sources to have its bucket list fulfilled. DIY gives you the chance to give yourself a shot, be it by making your own clothes, designing the walls of your house by yourself or by preparing a delicious meal. It lets you explore your own personality and pave way for a more independent you in the long run!

2. It gives you the best platform to learn

Source: construction photography

In life, we try, we fail. We try again, and maybe we fail again. We try once more, and voila! We succeed! That is what DIY is all about as well. It helps you to adapt to the trial and error that life is, gives you a taste of bitter and sweet from both worlds of failure and success and most importantly, let’s you learn and become a pro from a beginner.

3. It brings you appreciation

Source: Soda head

How many people are able to stitch their own clothes, design their walls and gift their friends, hand-made goodies? With DIY you can not only do this stuff, but also earn accolades from others for being able to do so.

4. It is pocket friendly

Source: clickprefect

While DIY is no doubt time demanding, it is also pocket friendly and can save you a lot of money which would be otherwise spent on buying things from conventional stores.
5. Self made is euphoric


Recall the moment you got your first pay check after pouring in all the sweat and hard work? Wasn’t it the best feeling? Well, with Do it yourself, you can always relive that feeling as being self-made or making anything yourself is probably in the world.

Connect with Us

Have some interesting DIY items to brag about? Share them us on Facebook and we might include them in our next blog.


Friday, 29 May 2015

DIY - A Beautiful Book Page Wreath From Old Papers

Best out of waste - the term certainly brings back school memories where you were to show your talent on bringing the best out of something that was technically of no use any longer. Well, not much has changed and you can still showcase your talent in making something creative out of things you would normally dump in the trash.

Here’s a fun technique to utilize old pages and manifest them into a beautiful wreath that will not only give your wall a classic look but also be an inexpensive way of exercising your creativity.


                    Image source: Jones design company


Things You Will Need:
-A thin, flexible metal rod

-Lots and lots of old papers

-Glue

-Scissors

Here’s what you need to do:

1) First, take the thin flexible metal rod and wrap it around a big circular object in order to get a perfect round shaped ring. The metal rod will be a little stubborn to bend but this will be the base of the wreath and hence, needs to be strong.

2) Now get your hands on those old papers and cut them in half with the help of scissors. Fold them evenly and staple them from the bottom. Make sure all your papers are cut in same lengths else your wreath would look uneven.

3) Next, take a paper punch and dig a hole on each of the papers that you have just cut. Slide the papers one by one on to the circular ring.

4) Now you need to use some glue to stick these pages on the ring in such a way that will prevent them from falling apart.

5) Now it’s time to leave your creation for a while to let it dry. Once that’s done, voila! You are ready to hang it on your wall, giving your home that vintage touch with just some creative techniques.

You can also place a bow or any other shiny object in the center of your wreath to make it more attractive.


If you like more colors, you can use colorful pages instead of the white and black set up. You can also use a CD as your base instead of a bigger circular object if you want your wreath to be small.

Connect with us:

Don’t forget to share what you came up with. Follow us on Facebook to keep a tab on some more of our creations. Also, do share with us if you have pictures of your own creations and projects, we would love to see them.


Friday, 15 May 2015

Innovative Ways to Stay Cool This Summer

We’re half way through the summer and a feeling of relief can be sensed among the population. Some cities across the country witnessed an extremely hot summer period while others felt right at home in the blistering heat. Before we start our monsoon celebrations we still have about 60 days of the season left.
We're giving you a few tips and tricks that you can try to stay cool and beat the heat this summer, some may sound strange but trust us, they work.

1. Utilize the freezer


About 10-15 minutes before you sleep, put your sheets in the freezer to cool off. Do make sure you place them in a plastic bag before you place them inside the freezer as you don’t want the smell of yesterday’s dinner to be absorbed by the fabric.

2. The wet cloth method
This trick is right out of a science book and it works wonders. Place a damp cloth over a stand fan or in front of an open window, when the fan is switched on or a breeze comes through, it’ll cool down the room instantly.

3. The cold water bottle


In the winter, many of us resort to hot water bottles to keep us warm, but you can also use them in the summer. Simply fill ice-cold water into it and keep it with you when the heat becomes unbearable.

4. Get down
We all know that hot air rises. So the perfect place to set up camp would be closer to the ground. Substitute your fancy bed for a comfortable mattress and you'll feel cooler in no time.

5. Get creative


Grains like rice and buckwheat aren't just for consuming, you can make a pillow using these as they don't absorb heat like cotton or goose feathers.

Connect with Black & Decker

If you used any of these methods or have a few ingenious ways to stay cool of your own, we’d love to hear from you. Get in touch with us on Facebook and leave your comments, thoughts on the blog or any sort of feedback.