Showing posts with label DIY crafts. Show all posts

Friday, 4 December 2015

5 cool DIY projects to improve your home

For everybody, their home sweet home is always special. It is the place that you don’t just call your very own, but also feel most comfortable in, and on that note, what better way to put your creative mind and DIY skills to use other than decorating and improving your home?


So in this week’s release, we give you five DIY projects to enhance your homes—

1      A family tree wall décor

source: pinterest

Family is the most important thing in one’s life and it is what makes a home what it is. Follow this simply tutorial http://bit.ly/1QVFtbN to create a personalized family tree for the walls of your living room or dining area and let it reflect all the beautiful moments of togetherness and love.


    Flower vases 

source: pinterest

Flowers always instill positive vibes in a home. In order to make flower vases like the ones above, all you need is wine bottles, some paint and twine. Click http://bit.ly/1VOgTd5 for the tutorial.

1       Guitar book shelf

source: recyclart

This is the most creative prospect for book lovers to showcase their DIY skills for something that they love immensely—books! Use your old guitar to build your brand new book shelf! For a step by step guide, visit http://bit.ly/1lxrX13

1
       Chandelier lights with tree branch

source: designboom

This one is the true definition of getting the best out of the waste, with some creative DIY hands. Use an old tree branch to build a brand new chandelier with lights and bulbs and decorate your dining space or living room. Visit http://bit.ly/1Q1XKUK for the tutorial.

1
       Bulletin board
source: huffington post

Decorate your bedroom wall with a customized bulletin board, featuring memories with friends, family, as well as to-do list to keep a track of your everyday routine. Visit http://bit.ly/1xvo6nm for tutorial.


Share with us

If you too have a bunch of interesting DIY ideas that can be implemented in improving and decorating your home, feel free to share with us. You can follow us on Facebook or leave your comments below.


Friday, 18 September 2015

5 DIY projects that you can finish off in a weekend

There are plenty of people in the world who are driven by doing projects on their own. Their knack of creating things is accelerated thanks to the concept of DIY, where you can push yourself to make things all by yourself, no matter what it is—apparels, décor, fine arts, cuisines or even architecture. 

However, most of the time, that knack is somehow suppressed due to the obvious time constraints in one’s day-to-day life.

Well, that being said, thankfully there are a variety of DIY projects that you can finish off just in a span of weekend. In this week’s release, we bring you five DIY projects that won’t take more than two days of your time—


       Glitter embedded glass vases


These DIY glass vases all beautifully decked with shiny glitter are a must have charm for your home as a decorative item, to be a lovely dwelling point for those mesmerizing white roses or lilies. Easy to make, you can even gift these vases to your loved ones on special occasions like birthdays and anniversaries.

source: popsugar

To know more about how you can create these beautiful vases yourself, visit http://bit.ly/1P7d66q


      2 in 1 photo frame and jewelry hanger

Creativity is the show stealer in every DIY craft and this one gives you ample space to be creative. With just a few handy things, you can make this photo frame be a part of your wall, and also ensure your jewelry is all fine and untangled in this space. 

source: popsugar
For a step by step guide on how to make this stylish 2 in 1 piece, you can visit http://bit.ly/1MuXUmj


   Scented candles made of oranges 

Fruits are nature’s gift to keep your body healthy and fit, and now you can also make the most of them by molding them into a DIY project, wherein you can make decorative scented candles with these orange peels. Not only do they make your homes and offices smell lovely, but also help in keeping those devilish mosquitoes away!

source: popsugar

To know how to do this one by yourself, click http://bit.ly/1I2nyfV


      Home décor pieces with spray paint

From Buddha idols to doves and regal jars—you can make all these popular show pieces as home décor items all by yourself just by using spray paints the right way.
Use monochromes or vibrant colours choice is all yours. 

To master this art, follow this step by step guide http://bit.ly/18ihTlL


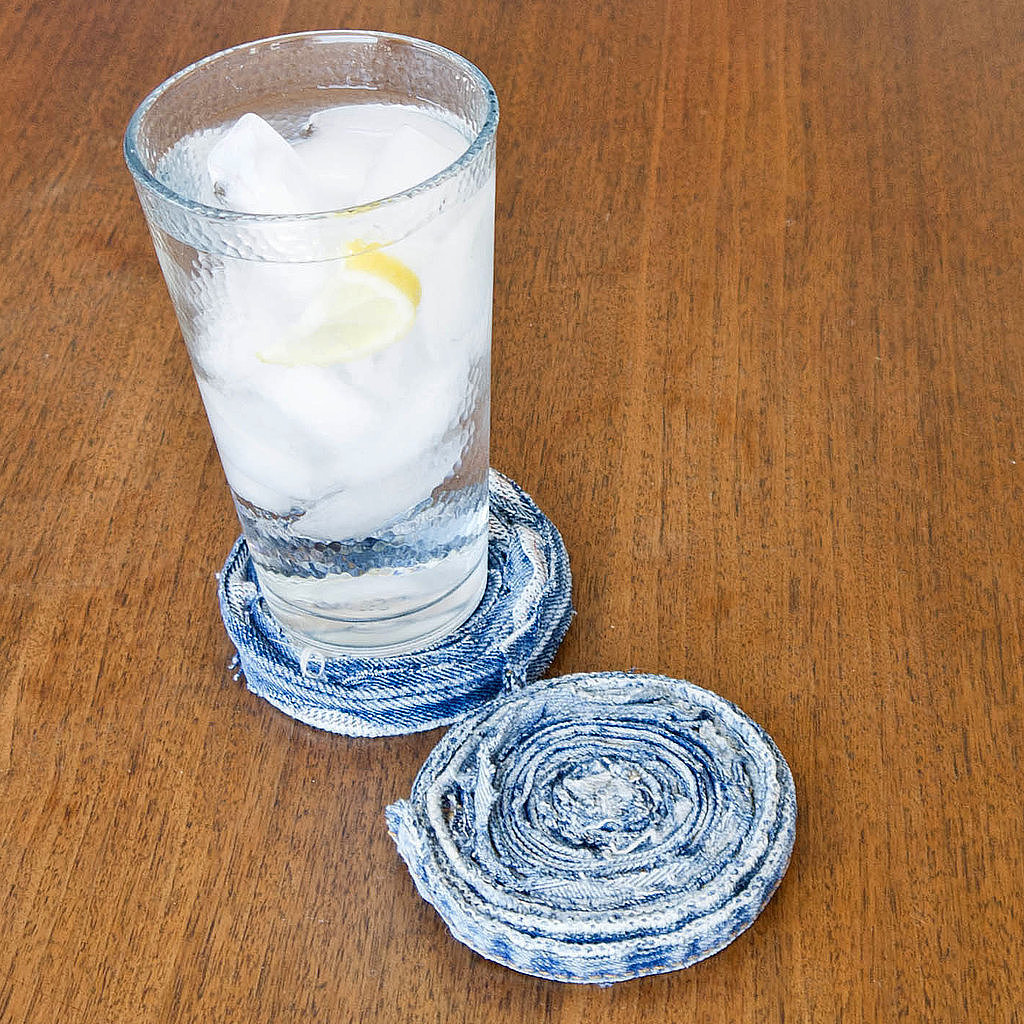
       Denim coasters for your dining tables

Who said those old jeans needed to be given away or dumped into garbage? You can use them to make some really creative and unique table coasters, to prevent condensation from your glasses or mugs, that too in less than some hours! 

source: popsugar

For more details on this easy DIY project, visit http://bit.ly/18ihTlL


Friday, 21 August 2015

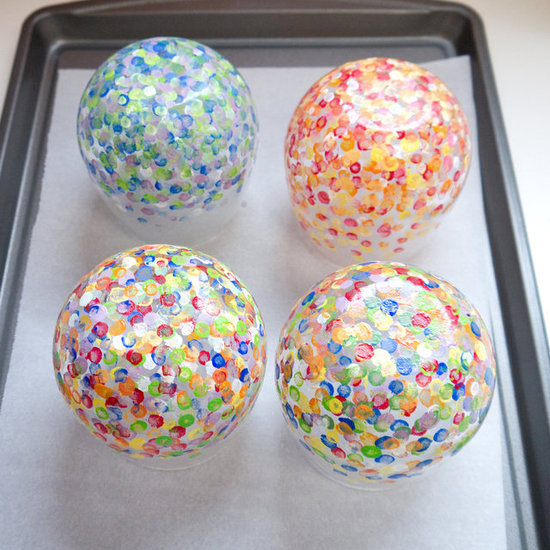
DIY—Colourful dotted tumblers

Colours add meaning to life. It is an undeniable fact that colours always grab your attention and make you appreciate the beauty of them, regardless of how old you are. Now when it comes to getting creative, you can do wonders with some colours.

In this week’s release, we tell you how to make some beautiful, colourful dotted glass tumblers that you can use not just as a decorative piece of art in your own house but also gift it to your near and dear ones.

Things you will need:
-Enamel acrylic paint—red, blue, green, white, yellow.

-Two/ Three glass tumblers

-Cotton swabs

-Paper towel

-A parchment paper

-A sheet pan

Steps to make colourful dotted tumblers:

1.       Arrange all your items in one place, and choose the colours of acrylic paint that you want to use in your tumblers


2.       Take a sheet of paper towel and fold it evenly into half. Pull out dollops of each colour from the acrylic paint containers on the paper towel.


3.       It is up to your creativity when it comes to mixing colours. You can keep it simple or try experimenting, additionally, adding white to them to get some more new colours that you would like on your tumbler.

4.     Take a sheet of parchment paper and place it properly on the sheet pan.  Now flip your glass tumblers upside down on the pan, and dip your cotton swab into the colours and start dotting the tumblers. This will be your first layer of dots. As you are done with one tumbler, keep it aside to let it dry while you continue working the same way on the other tumblers. 


5.       After you are done with the first layer of dots and it is dry, start with the second layer, experimenting with your desired colour combinations. Be careful to dot from the base to the sides of the tumbler, and avoid getting closer to the edges.


6.      As soon as you are done with the double layering and you are sure that the paint has dried up, insert the pan inside a cold oven and bake your creation at a temperature approximately at 350 degrees Fahrenheit, for around 20-30 minutes in order to set the paint.


7.      Once you are done with the baking, let it cool down for a while before you flip them. And there you have it! Your own DIY colourful dotted glass tumblers. Gift them to your friends or keep them as a show piece.

Connect with us:

If colours are a part of your DIY projects as well, then we would love to see some of your creations. Connect with us on Facebook, or leave your comments below. We are always pleased to read them!
-
Images source: popsugar