Showing posts with label DIY. Show all posts

Friday, 5 February 2016

5 Times Instagram Had Great Valentine’s Day Ideas

It’s that time of the year. Roses, hearts and dinner dates for two. Valentine’s Day brings out the best in us, we become a little more creative, add a lot more emotion into what we’re doing and it’s all in the name of love.

While some of you may be well versed in the art of gifting, there are still a few who tremble at the thought of giving a ‘bad’ present, especially if it’s your first time. Here are the top 5 Valentine’s Day gifts that we found that could inspire you.

1. Old School

If you want to go old school, you can always go for a gift hamper. They’re easy and full of lots of things that she or he will like. The best part with this idea is, you can never go wrong as there will be something in the hamper that she or he will love.


2. An All-Time Favourite

Flowers are an all-time favourite. This one may be focused more for the ladies but then again Valentine’s Day was meant for the ladies anyway. Always make sure your colour combinations are spot on.


3. For The Sweet Tooth
If this is your first Valentine’s Day with your partner, then don’t go over the top as you could scare them away. Chocolates are a good idea and what’s more important than the gift in this case is how you present it.

A photo posted by 07504409922 Erbil Dream City (@finetulip) on

4. A Love Bake?

If you are a whizz in the kitchen and feel that making something is always better received than buying something, a few quirky cupcakes should help you land in the good books.

A photo posted by cakeliciouskolkata (@cakelicious_kolkata) on

5. The Next Level

Now, if you’re a veteran in the love game then you’ve probably seen it all before. Flowers, chocolates, cakes these things probably don’t tickle your fancy or your partners. If this is the case you need to take it to the next level. Plan a getaway for two. Instant appreciation guaranteed!


What Have You Got Planned?


If you’ve got something else planned for the 14th then do share it with us! Help your fellow ‘Lovers’ out. You can connect with us on Facebook.

Friday, 29 January 2016

5 cool DIY crafts you definitely got to try this 2016

It’s 2016 and it’s time to get a little artsy and crafty!


Here are some super amazing and super easy DIY ideas that can help you transform your home into a creative and stylish space in no time! So without further ado, let’s get started—

1      Fork hooks

source: ofdesign

Use your old forks to create a brand new set of fork hooks to hang the newbie forks in the kitchen or dining space. You would only need old forks, a wooden board, nose pliers and a hammer to create this fun DIY craft. For the tutorial, click http://bit.ly/1UuFkuJ

1       A colorful wine rack

source: brit

A perfect and colorful wine rack to store your wine bottles! All you need for creating this are some old tins, spray paints, and glue. For a step by step guide, click http://go.brit.co/1PXiatb

1      Beautiful wine glass lampshades

source: tamarajewelry

Use your old wine glasses to create these pretty little lampshades and decorate your bedrooms or gift them to your loved ones. Here’s the tutorial-- http://bit.ly/1SnkpKN

1       Painted pottery

source: pinterest

Porcelain mugs or bowls and paint pains—that are all you need to create this DIY craft! Here’s a step by step guide to help you— http://bit.ly/1lZufpm

1       Handy jewelry organizer

source: brit

Get yourself a perfect handy jewelry organizer in your room with this cool DIY craft. Here’s the tutorial-- http://go.brit.co/1fZdwjR


Share with us your DIY craft ideas

If you have some cool, crafty, yet easy DIY ideas, do share them with us. You can follow us on Facebook or simply leave your comments below!


s


Monday, 26 October 2015

5 DIY projects for your beloved pets

Our pets fill our lives with immense joy and positivity. Be it after a stressful day at work or a busy bee routine for the week, our pets are always there to not just relieve us from stress but also show us that someone cares. So in return, we can do something for these bundles of joy too.


In this week’s release, we are going to see five simple DIY projects that we can create to reciprocate the love and affection to your pets.

1.       Pallet dog bed

source: iheartdogs

Transform your old pallet into a brand new bed for your dog or cat. The concept is pretty simple, which would require you simple ingredients like an old pallet, measuring tape, fabric and other stuff like paint and zippers to showcase your favorite kind of art on your dog’s cot.
For a step by step tutorial, click http://bit.ly/Zzf9ws

2.       Suitcase bed for your cat

source: vetcall

How amazing it is to have a perfect and cozy bed for your beautiful fluffy cat made out of your old suitcase? Well, this simple DIY tutorial will tell you how. http://bit.ly/1GusV7B

3.       Feeding station for your pet

source: etsy

You enjoy your delicious food at the dining table; how about making a perfect dining station for your pet as well? Click on this simple tutorial to learn how to do it- http://bit.ly/1OLIx9O

4.       Cute fabric teepee

source: fudgeandjoy

Pets love to spend time with you outdoors and hence, the best gift you can give your pets is by creating a cute fabric teepee to make their outdoor moments fun and memorable with you. Follow this easy step by step guide to create one yourself— http://bit.ly/202Ec5R


5.       Homemade organic shampoo

source: seespotbake

If you believe in avoiding the chemical decked shampoos in the market and sticking to organic and herbal stuff, then why not create some organic stuff for your pets as well? This easy guide to make home made shampoo for your furry buddy is not just easy but also great for its health—


Connect with us

If you have got pets and you have tried your hand at DIY projects to create something special to show your love and affection to your dearest fluffy pals, do share them with us! You can follow us on Facebook or leave your comments below.


Friday, 16 October 2015

DIY projects for people clueless about DIY

The world is flooding with DIY art and for some reason, even you want to try your hand at it; either because you have a knack of self created art or you just want to give it a try and be a part of the happy and proud DIY bandwagon. Well, you may not have a clue about how to approach it, but hey, Rome wasn’t built in one day!


So this week we show you some DIY projects that are apt for beginners, especially those who aren’t that well versed with art but have extreme potential in terms of creativity. And right before we start, always remember, you may not get it at the first go, but it’s only practice that’s going to make you perfect!

1.       Sparkling glittery pumps

If you don’t have matching red sparkling pumps with that gorgeous prom dress, not to worry. As glitters, fabric glue and a pair of old pumps are all it takes to create a brand new pair of glittery pumps. Here’s an easy tutorial to help you out— http://bit.ly/1RtbxRS

source: pinterest

2.       Designed sharpie mugs

You might not be great with designing, but that doesn’t mean you can’t get a little artistic with a sharpie. From dotted patterns to abstracts, you can create your self-designed sharpie mugs with just mugs, sharpie and an oven, and gift them to your loved ones. Here’s how to do it: http://bit.ly/1BxSgo7

source: pinterest

3.       Wall photo collage

Memories are the best thing that you can gift someone and it turns even better when you can compile a bunch of memorable moments and gift it your near and dear ones in the form of photo collages. Here’s the tutorial for you: http://bit.ly/1cwx3Qp

source: brit

4.       Chic style sneakers

If you are bored with your old, conventional sneakers, time to give it a designer revamp. You can follow this easy guide to flaunt those awesome chic style DIY sneakers: http://bit.ly/1sroRwG

source: diy-enthusiasts

5.       Bowler hat lamp shades

Creative, stylish and easy—this DIY project certainly gives you ample room to create some fancy home décor yourself. Bowler hats, bulb holder, cable and scissors are all you need to go ahead with this one. Find out how, here:  https://www.youtube.com/watch?v=kuKYEBW3XOA

source: pinterest


Share with us

How was your experience with DIY projects as a beginner? What ideas did you come up with and were they successful or were you disappointed? Don’t forget to share your own beginner level DIY stories with us. Connect with us on Facebook or leave your comments down below. We love reading them!

Friday, 9 October 2015

5 DIY projects that you can finish off in just 5 minutes

You love creativity and the world of DIY, but time constraints can be such a wicked thing, hampering your knack of creating things, and hence, in this week’s release we show you five DIY projects that you can start and finish off in just five minutes.


      Fancy candles with duct tapes


Candles are your answer not just to avoid darkness but also for being an amazing item for home decors. Well, how wonderful would it be if you could transform those conventional white candles into sparkling fancy ones? Well, with this simple yet stunning DIY project, you can actually do it, that too in just five minutes! The requisites, you may ask? Nothing much, just some colored duct tapes.

source: Buzzfeed

For a step by step guide, click http://bit.ly/1FW5ofQ

      Ink bloated napkins

Time to get the little artist in you come out! With just some fabrics and acrylic paint, you can finally turn your painting dreams into a living reality and also give your creations as gifts to your loved ones!

Source: papernstitch

For a step by step guide, visit http://bit.ly/1GA6cBV

      Leather key chains

Key chains are always a good to go gift for everybody. Be it your friend, mother or yourself. The gift becomes all the more special when you make it all by yourself, that too real quick. With this DIY project, you embrace your creativity and hey, those keys are all safe and secure!

Source: fynesdesigns

To know more about how to create these, visit http://bit.ly/1L3mNlJ

      Vintage button bookmarks

Vintage is always classy and bookmarks are always essential. Combine both of them in your creative sphere and voila! You have your amazing set of vintage button bookmarks to help you never lose track of pages of your favourite novel and at the same time enhance your creative skills.

source:  craftgawker

For a step by step direction guide, visit http://bit.ly/1ZkeLMT

      Wooden stencil coasters

Use your creativity blending it with some spray paint and stencil to transform those conventional wooden coasters into fancy ones and give your dining table items a perfect brand new look!

Source: pixel

To get a step by step guide for this, click http://bit.ly/1PkGEjs

Connect with us

If you too have some quick DIY projects that can be finished off in five minutes, then do share them with us. We would be happy to see your creations! You can connect with us on Facebook or leave your comments here.


Friday, 4 September 2015

5 DIY projects for pros

The world of DIY projects is quite a dynamic sphere. While some of these projects need contents that are pretty handy and also flexible to work on with time constraints, some projects are a little trickier and require a lot of patience, vision and of course DIY skills.

In this release, we are going to list 5 DIY projects that are for pros— 

Wooden chopper


If you are too good with wooden work and crafts, this is your thing, especially if you are aiming at brushing up your skills with work that requires minute detailing. Gift it to someone or keep it as a work of art in your own house—this wooden helicopter requires a lot of concentration, patience and detailing skills to look something like this, with finesse.


      Moroccan tea set


If you are a seeker for fine dining places with beautiful and lavish looking crockery and tea sets, then perhaps you would like to build one set yourself for your own dining table. This subtle yet classy DIY project of tea set adds a layer of charm to your home décor. 


    Vertical Wooden book shelves


Whether you are a voracious reader yourself or not, if DIY is your thing, then you should definitely give this wooden book shelf a try. With such a clean, subtle and organized design, it is certainly meant to add an elegant dimension to your room.


       Knitted mono/multi coloured gloves


So if you are planning a trip to Finland or any other cold location, layers are most definitely going to be your best pas during the trip. So why not give knitting your own gloves a try? Added advantage is you get to choose your desired colours. So, if you are all set to go to a cold land and beat the heat—just knit!


      Patch blankets/quilts


From baby blankets to quilts for adults, patchwork can help you create so much of variety, with elegant and classy designs. From black and white to darker shades, if you have mastered the art of patchwork, then this is something you should definitely give a try!


Connect with us

If you too have created DIY projects that are quite challenging, do take time to share them with us. We would love to see them! You can connect with us on Facebook and leave your comments below.

Friday, 28 August 2015

DIY— Cake Stands for Yummy Cakes and Cupcakes

You hear the word ‘cake,’ and the term ‘Yum’ is pretty instantaneous as a reply that comes out of your mouth. The whole thing about cakes and confectionaries is pretty dramatically appealing and manages to elate anyone, regardless of age to go a little berserk to have them all.

Well, if you are a fan of yummy cakes and good decorations around, then you might want to give making beautiful cake/cupcake stands a try yourself!

So in this week, we are going to tell you how you can create beautiful cake stands for some yummy and savoring cakes.

Things you will need

- Old microwave plates

- Candle stands

- Pie dishes

- Spray paint

- Glue

  1. Take a candle stand and on top of it attach one of the old microwave plate or a pie dish.

  2. Make sure that you use good glue so that the objects are fixated properly to each other and don't fall apart.
  3. Take a spray paint—colour can be of your choice. You can keep it plain black, blue, or white if you want a monochromatic look, or go for multiple colors for a more colourful outlook.
  4. Spray the first coat of paint upside down. As you leave it to dry, take another stand and repeat the same step of attaching it to a pie dish.

  5. You will need altogether three coats of spray paint, neatly done, for a clean finish and shiny appearance.
  6. Once that’s done, you have your all new cake stand, completely made by you!


Connect with us

If you too have some amazing ideas for decorating confectionaries or making stands for cupcakes, cakes and other food items, don’t forget to share it with us. We would love to hear you! Connect with us on Facebook or simply leave your comments below.

Friday, 21 August 2015

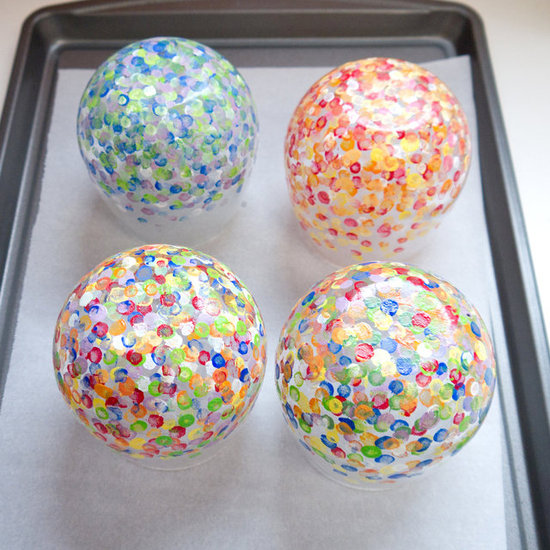
DIY—Colourful dotted tumblers

Colours add meaning to life. It is an undeniable fact that colours always grab your attention and make you appreciate the beauty of them, regardless of how old you are. Now when it comes to getting creative, you can do wonders with some colours.

In this week’s release, we tell you how to make some beautiful, colourful dotted glass tumblers that you can use not just as a decorative piece of art in your own house but also gift it to your near and dear ones.

Things you will need:
-Enamel acrylic paint—red, blue, green, white, yellow.

-Two/ Three glass tumblers

-Cotton swabs

-Paper towel

-A parchment paper

-A sheet pan

Steps to make colourful dotted tumblers:

1.       Arrange all your items in one place, and choose the colours of acrylic paint that you want to use in your tumblers


2.       Take a sheet of paper towel and fold it evenly into half. Pull out dollops of each colour from the acrylic paint containers on the paper towel.


3.       It is up to your creativity when it comes to mixing colours. You can keep it simple or try experimenting, additionally, adding white to them to get some more new colours that you would like on your tumbler.

4.     Take a sheet of parchment paper and place it properly on the sheet pan.  Now flip your glass tumblers upside down on the pan, and dip your cotton swab into the colours and start dotting the tumblers. This will be your first layer of dots. As you are done with one tumbler, keep it aside to let it dry while you continue working the same way on the other tumblers. 


5.       After you are done with the first layer of dots and it is dry, start with the second layer, experimenting with your desired colour combinations. Be careful to dot from the base to the sides of the tumbler, and avoid getting closer to the edges.


6.      As soon as you are done with the double layering and you are sure that the paint has dried up, insert the pan inside a cold oven and bake your creation at a temperature approximately at 350 degrees Fahrenheit, for around 20-30 minutes in order to set the paint.


7.      Once you are done with the baking, let it cool down for a while before you flip them. And there you have it! Your own DIY colourful dotted glass tumblers. Gift them to your friends or keep them as a show piece.

Connect with us:

If colours are a part of your DIY projects as well, then we would love to see some of your creations. Connect with us on Facebook, or leave your comments below. We are always pleased to read them!

-
Images source: popsugar


Friday, 7 August 2015

B&D DIY: Insulated Plastic Cup

A barbeque party, office tea or a glass of wine, drinks are more enjoyable when you can sip them at the temperature you want, cold or warm. Thanks to the wide world of DIY, getting creative and make an insulated cup yourself is easier than ever. This imaginative innovation will help keep your drink the temperature you want for longer.

Here’s what you will need:

- One paper towel
- Two plastic cups

Yes, that’s all you would need!

Here’s what you need to do:

-Firstly, get all the materials you need in front of you so that when you start work, you can finish it without moving to and fro.


-Now, take one large sheet of paper towel, fold it in half length wise.
 

-After that, wrap the folded paper towel around one of the plastic cups. Make sure it’s tight and snug.


-Now insert the paper towel wrapped cup carefully into the other plastic cup. 


-That’s it. You are done. Wasn’t that easy?

You can test it for yourself and see your drinks will not only retain their temperature in these insulated cups, but also prevent any condensation of water droplets outside of your cup.

Connect with us

For more interesting DIY tips and tricks, follow us on Facebook. Also, if you found this helpful, share this with your friends and family. Happy DIY’ing

[Images Courtesy : Instructables.com]

Friday, 31 July 2015

Five DIY’ing Instagrammers

In this week’s release, we have searched through Instagram thoroughly to bring you a few DIY projects and crafts that people around the world have done. Some are functional, while others are decorative and you will probably find one that is both.

Hopefully these will inspire you to kick on and try a project for yourself.
  1. Let’s start small. Something nice for you hyper children to keep them occupied. Although make sure when they're playing, they're also wearing safety goggles.
  2. Speaking of children, what about some minion cupcakes. They're easier than you think.
  3. Sticking to the small ones. What about these DIY earrings? Great work by this instagrammer!
  4. A photo posted by @heavens_natives on
  5. Here is something a little more functional. Now your shoes can be kept as neatly as your clothes.
  6. For those more adventurous, here is an idea for your bedroom.
Are you brave enough?

Let us know which one of these you liked and would consider trying, leave your questions and comments below and we will help you with any information regarding the tools you will need and the materials.

Follow us on Facebook for more updates.

Friday, 24 July 2015

DIY: The Coin Vase

A common misconception these days is that DIY is mainly pursued to fix or build things. What people forget is that there a few things you can do to improve upon an object or parts of your house, either for appearance or functionality purposes. If you have been following our Facebook page, you would have noticed that we at Black & Decker are on a mission to convert shoppers into what we like to call, DIY-ers.

Stop buying and start making. That is our philosophy and this week we are going to show you how to glam up an old vase. Many of you will say that most vases are already decorative and very pleasing to look at.

Well, if you have owned one you would know that after a few years the same design can get a little boring and it will soon defeat the very purpose it was bought for (To please your taste). Follow these steps and we guarantee a smile with a tilted head at the end of it.

What you will need
  • An old and boring vase
  • Lots of coins, about 100 to be on the safe side
  • Black acrylic paint. Nothing too glossy
  • A strong adhesive

The procedure
  1. First, paint the entire vase with the black acrylic paint. Once it has dried, give it another coat.
  2. Leave it for a while until the vase is completely dry.
  3. This next step requires you to get the coins out and stick them next to each other, moving all the way around the vase, like this.


  4. Once you have covered the entire area with coins, you need to let the glue dry.
  5. Once the glue is dry and you are sure that none of the coins will fall off, the next step is to find a spot to place this vase and fill it with flowers or potpourri.

                           Source

As simple as that

That was simple enough. For more great home improvement ideas, follow us on Facebook and bookmark this page. We will be back next week.