You hear the word ‘cake,’ and the term ‘Yum’ is pretty instantaneous as a reply that comes out of your mouth. The whole thing about cakes and confectionaries is pretty dramatically appealing and manages to elate anyone, regardless of age to go a little berserk to have them all.
Well, if you are a fan of yummy cakes and good decorations around, then you might want to give making beautiful cake/cupcake stands a try yourself!
So in this week, we are going to tell you how you can create beautiful cake stands for some yummy and savoring cakes.
- Old microwave plates
- Candle stands
- Pie dishes
- Spray paint
- Glue
Connect with us
If you too have some amazing ideas for decorating confectionaries or making stands for cupcakes, cakes and other food items, don’t forget to share it with us. We would love to hear you! Connect with us on Facebook or simply leave your comments below.
Well, if you are a fan of yummy cakes and good decorations around, then you might want to give making beautiful cake/cupcake stands a try yourself!
So in this week, we are going to tell you how you can create beautiful cake stands for some yummy and savoring cakes.
Things you will need
- Candle stands
- Pie dishes
- Spray paint
- Glue
- Take a candle stand and on top of it attach one of the old microwave plate or a pie dish.

- Make sure that you use good glue so that the objects are fixated properly to each other and don't fall apart.
- Take a spray paint—colour can be of your choice. You can keep it plain black, blue, or white if you want a monochromatic look, or go for multiple colors for a more colourful outlook.
- Spray the first coat of paint upside down. As you leave it to dry, take another stand and repeat the same step of attaching it to a pie dish.
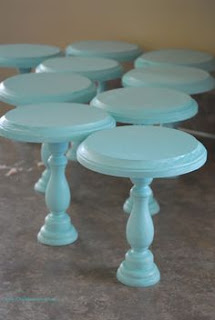
- You will need altogether three coats of spray paint, neatly done, for a clean finish and shiny appearance.
- Once that’s done, you have your all new cake stand, completely made by you!


Connect with us


